[Ovirt] KVM 가상화 Management software - Ovirt 4.4.x
설치 시간이 오래 걸립니다. 스팩에 따라 다르겠지만 90분에서 120분 까지 소요되는 것 같네요.
Reference
Intro
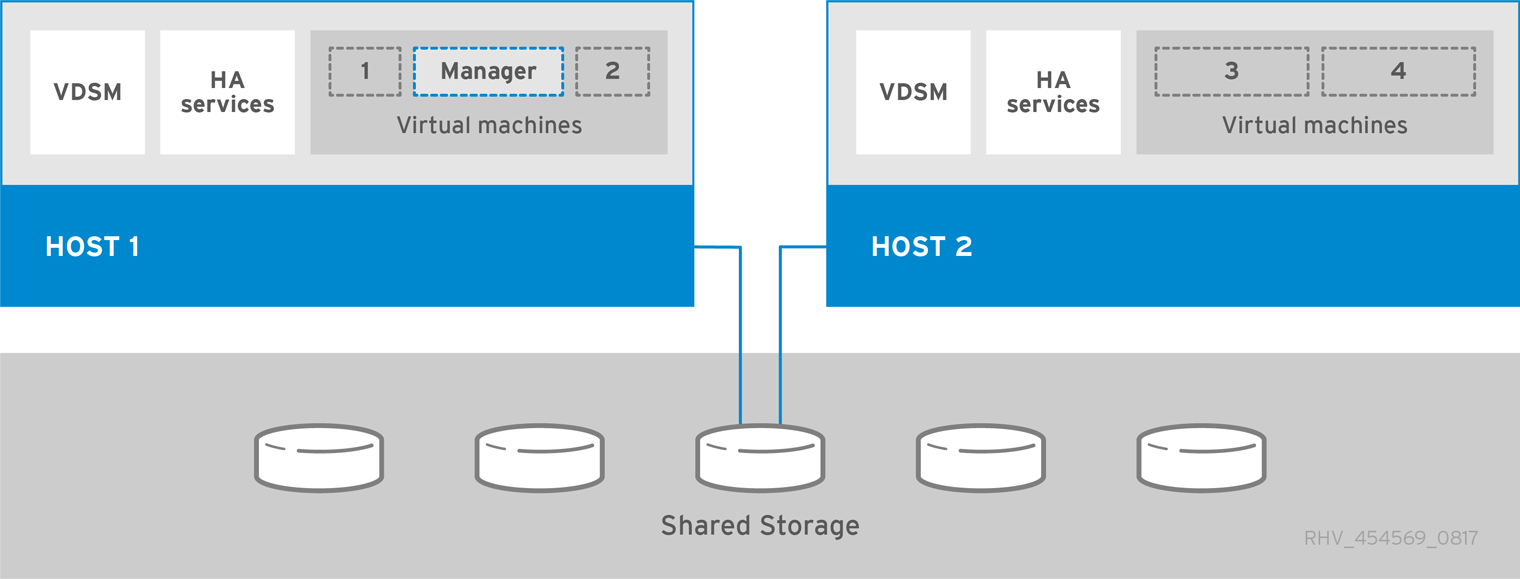
Ovirt는 여러 Host에서 가상머신을 관리할 수 있도록 개발된 (KVM) 기반의 소프트웨어 입니다.
각 Host에게 VM 배정 및 Resource를 관리하는 Manager Unit이 Host 위에 VM으로 구동되는 Self-hosted 모드가 있고,
별도의 서버에 Manager를 구성하는 Standalone 방식이 있다.
본 포스팅에서는 CommandLine으로 slef-hosted Ovirt를 구성하는 방법에 대해 기술하고자한다.

ENV
Ovirt 4.4.X

Distributor ID:    CentOS
Description:    CentOS Linux release 8.2.2004 (Core)
Release:    8.2.2004

# firewalld on
# setenforce 0

eth0 : mgmt bridge (IP가 설정돼있어야함)
Configuration
Prerequisite
VM 데이터가 저장될 NFS Exporter를 설정합니다.
저는 테스트 시스템에 저장할 예정으로 Local에다가 하겠습니다.
- ISCSI, FC, Gluster 등을 사용하시려면 가이드를 참고 부탁 드립니다.
- https://www.ovirt.org/documentation/installing_ovirt_as_a_self-hosted_engine_using_the_command_line/index.html#Preparing_Storage_for_RHV_SHE_cli_deploy
Create User / Group
# groupadd kvm -g 36
# useradd vdsm -u 36 -g kvm
Create Directory for data and set owner, permission
# mkdir /data
# chown -R vdsm:kvm /data
# chmod 755 /data
Set NFS Server
# echo "/data *(rw,sync,no_root_squash)" >> /etc/exports
# systemctl enable nfs-server --now
Check Mount
# mount -t nfs localhost:/data /mnt
# df -h /mnt
Filesystem       Size  Used Avail Use% Mounted on
localhost:/data  150G  2.5G  148G   2% /mnt

# umount /mnt
Deploy Self-Hosted Engine
Add repository
# dnf -y install https://resources.ovirt.org/pub/yum-repo/ovirt-release44.rpmInstall engine-appliance
# dnf -y install ovirt-engine-applianceInstall Deployment tool
# dnf -y install ovirt-hosted-engine-setupInstall tmux and run into tmux session to avoid session closing
# dnf -y install tmux
# tmux
Edit /etc/hosts for Engine
192.168.123.200 manager.virt-go.yjwangDeploy
# hosted-engine --deploy

...
Gateway 설정

          --== HOST NETWORK CONFIGURATION ==--

          Please indicate the gateway IP address [192.168.123.1]: Enter

...
Bridge Interface 설정
          Please indicate a nic to set ovirtmgmt bridge on (eth0, eth1) [eth0]:
          Please specify which way the network connectivity should be checked (ping, dns, tcp, none) [dns]: ping

...
Data center 설정
          Please enter the name of the data center where you want to deploy this hosted-engine host.
          Data center [Default]:

          Please enter the name of the cluster where you want to deploy this hosted-engine host.
          Cluster [Default]:

Engine 스펙
          If you want to deploy with a custom engine appliance image, please specify the path to the OVA archive you would like to use.
          Entering no value will use the image from the ovirt-engine-appliance rpm, installing it if needed.
          Appliance image path []:
          Please specify the number of virtual CPUs for the VM. The default is the appliance OVF value [4]: 2
          Please specify the memory size of the VM in MB. The default is the maximum available [14773]: 8192

...
Engine FQDN 설정 (/etc/host에서 설정한 내용)
          Engine VM FQDN:  []: manager.virt-go.yjwang
          Please provide the domain name you would like to use for the engine appliance.
          Engine VM domain [virt-go.yjwang]:
          Enter root password that will be used for the engine appliance:

Engine root password / IP 설정
          Confirm appliance root password:
...
          SSH public key []:
...
          Do you want to enable ssh access for the root user? (yes, no, without-password) [yes]:
          Do you want to apply a default OpenSCAP security profile? (Yes, No) [No]:
          Please specify a unicast MAC address for the VM, or accept a randomly generated default [00:16:3e:13:69:c2]:
          How should the engine VM network be configured? (DHCP, Static)[DHCP]: Static
          Please enter the IP address to be used for the engine VM []: 192.168.123.200
[ INFO  ] The engine VM will be configured to use 192.168.123.200/24
          Please provide a comma-separated list (max 3) of IP addresses of domain name servers for the engine VM
          Engine VM DNS (leave it empty to skip) [192.168.123.1]: 8.8.8.8

          Add lines for the appliance itself and for this host to /etc/hosts on the engine VM?
          Note: ensuring that this host could resolve the engine VM hostname is still up to you.
          Add lines to /etc/hosts? (Yes, No)[Yes]:
...
          Please provide the name of the SMTP server through which we will send notifications [localhost]:
          Please provide the TCP port number of the SMTP server [25]:
          Please provide the email address from which notifications will be sent [root@localhost]:
          Please provide a comma-separated list of email addresses which will get notifications [root@localhost]:
          Enter engine admin password:
          Confirm engine admin password:
...
          Please provide the hostname of this host on the management network [virt-go-c83-189]:
...
이 부분부터 Engine을 올려야하기 때문에 많은 시간이 소요됩니다.

...
끝나면 Storage 세팅

          Please specify the storage you would like to use (glusterfs, iscsi, fc, nfs)[nfs]:
          Please specify the nfs version you would like to use (auto, v3, v4, v4_0, v4_1, v4_2)[auto]:
          Please specify the full shared storage connection path to use (example: host:/path): 192.168.123.183:/data
          If needed, specify additional mount options for the connection to the hosted-engine storagedomain (example: rsize=32768,wsize=32768) []:

...
[ INFO  ] Stage: Pre-termination
[ INFO  ] Stage: Termination
[ INFO  ] Hosted Engine successfully deployed
Check Engine status
# hosted-engine --vm-status


--== Host virt-go-c82-183 (id: 1) status ==--

Host ID                            : 1
Host timestamp                     : 6214
Score                              : 3400
Engine status                      : {"vm": "up", "health": "good", "detail": "Up"}
Hostname                           : virt-go-c82-183
Local maintenance                  : False
stopped                            : False
crc32                              : c5bd3c2a
conf_on_shared_storage             : True
local_conf_timestamp               : 6214
Status up-to-date                  : True
Extra metadata (valid at timestamp):
        metadata_parse_version=1
        metadata_feature_version=1
        timestamp=6214 (Tue Jun  1 08:02:48 2021)
        host-id=1
        score=3400
        vm_conf_refresh_time=6214 (Tue Jun  1 08:02:48 2021)
        conf_on_shared_storage=True
        maintenance=False
        state=EngineUp
        stopped=False
이후 위에서 설정한 manager IP로 접속을 하면 관리 콘솔에 접속을 할 수 있고, 지정한 admin 암호로 접속하면된다.
https://<Manager_FQDN>/ovirt-engine
이후 manager fqdn 외에 다른 도메인으로 접속하려면 아래와같이 설정해주면 된다.
# vi /etc/ovirt-engine/engine.conf.d/99-custom-sso-setup.conf
SSO_ALTERNATE_ENGINE_FQDNS="alias1.example.com alias2.example.com"
설정 후 host에서 engine을 재시작한다.
# hosted-engine --vm-shutdown
# hosted-engine --vm-start
VM exists and is Down, cleaning up and restarting
VM in WaitForLaunch
시간이 지나면 아래와 같이 상태가 Up 으로 된다.
# hosted-engine --check-liveliness
Hosted Engine is up!
Issue
CentOS 8.3 으로 진행하니 아래 Error가 계속 발생한다. Appliance 패키지가 안정화되지 않은 것으로 보인다. 8.2 로 진행하니 이상이 없다.
is compatible with versions (4.2,4.3,4.4) and cannot join Cluster Default which is set to version 4.5.